
Here is what I worked on today while I was student teaching at the high school. It is called drypoint etching and it is a form of printmaking. This was my first experience printmaking to be honest. Yes, I am expected and will be teaching printmaking even though I am learning it along side my students! I chose the photography route in college instead of taking printmaking. Do I regret taking photography? No way!!!! Do I regret not throwing in a printmaking course and overloading my schedule? For sure!!!! Who know's, perhaps in the future I will take a course in the summer or what not.
So for those who have no idea what dry point etching is, here is the quick 10 cent tour! Drypoint is in the itaglio family of printmaking techniques in which your image is cut/engraved/etched into a surface, known as the matrix or plate. For our plate we are working with plexiglass because it is easy to use, clean, and oh ya it's relatively cheap in comparison to copper, zinc, or acetate!
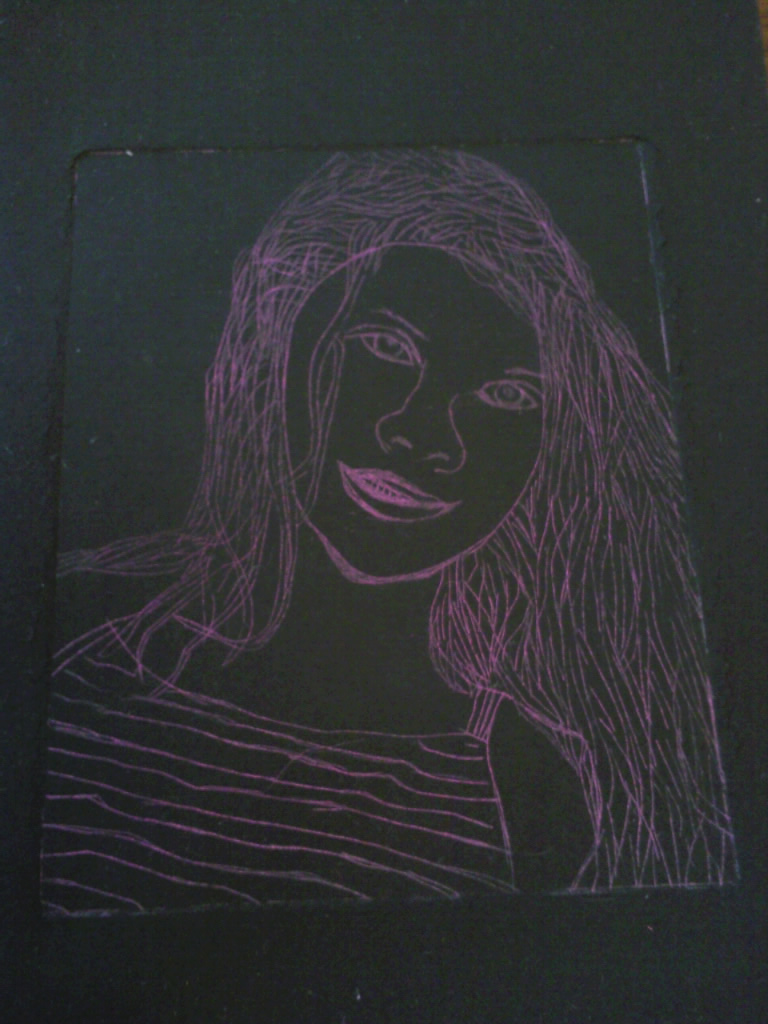
So pretty much you make your design, mine was based on this photograph of my little sister Mary Grace:

Put it under the plexiglass plate and then you take your carbide-tipped needle (cool word for a stick with a sharp metal point on the end) and start to engrave all the lines you want.

When you are done with that you are ready to start printing! You want to put your fiber paper into water to soak because you need it to be damp. So you take your colored ink and place it ontop of your plexiglass plate and spread it using a piece of hard matting board then scrape off as much as you can. (not my image, but shows the same process)

Then you take newspaper and in a twisting motion wipe off all the colored ink left on the plexiglass plate. (again not my image, but shows the same process)

Once you have as much off as possible, you take tarlatan cloth and wipe away the excess ink so all you can see is some faint colored ink inside the engraved areas. It ends up looking like you cleaned it. (not my image, but shows tarlatan wiping clean process)

Next step is to take out that paper that has been soaking and you place it inbetween watercolor paper and take the brayer and go over it to get excess water leaving it only a bit damp to the touch. (not my picture, but gets the point across)

Then you are FINALLY ready for printmaking your image! You first place your plexiglass plate with the inked engraved side up towards you. Then you place your damp paper right on top of it. Then you put the blanket over top and start to turn the rollers and roll over it. (Not the one I use, but close enough to get an idea!)

Once you rolled over it you pick up the blanket and carefully pick up your paper and you will end up with a print like this (Notice I forgot to flip my image when etching it as it reverses when being printed, however it still worked out fine!):

You repeat the whole process over again with the inking, wiping, and putting it through the press to create a series. Most artists print at least 6 copies of their plate in order to create a series. Each one is numbered to show what copy number it was.
I did 6 on white paper in my series with gold ink, then one with gold ink on black paper, and then I cleaned the plate and had time for one using pink ink on black paper.


So there in a nutt shell are a few pictures and a quick overview of a random part of my day. Nothing is ever boring in the art room!

No comments:
Post a Comment