As promised here are the Before's and After's of my 2nd remodel project. Compared to a bedroom, the size and multiple areas/rooms presented itself as a much larger undertaking. Right as we were about the start stripping wallpaper done I remembered I had to take some before pictures of the room! So at about 1 a.m. here are the dark terrible before pictures.....well they will make the after pictures that much better :)
(all pictures can be clicked on to be larger to view details --- please don't notice any dust or dirt!)
What you don't have a treadmill in your family room?!?!
The cage is not generally there, it was set up for Havoc my brothers dog
Starting to strip the wallpaper
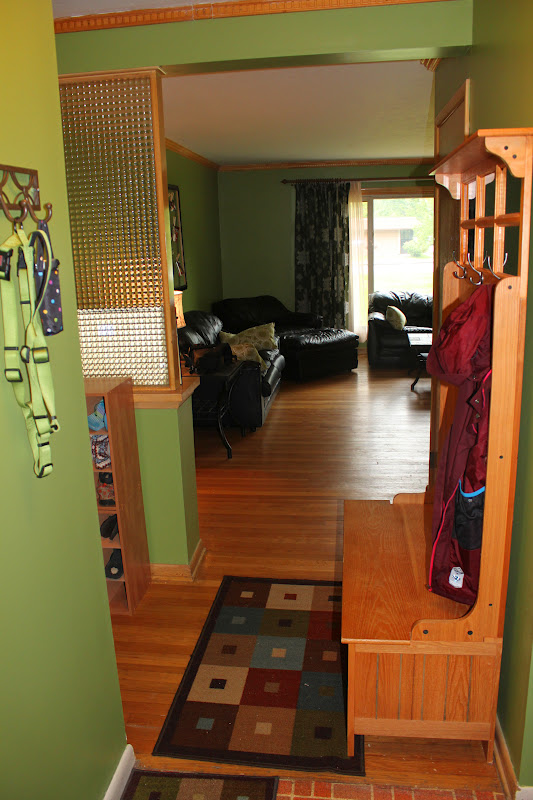
Main hallway --- bad angle shot
Yup even Mr. Levi helped with renovating efforts!
Bye Bye Wallpaper!
Front main entrance
We were all just so tired with the amount of work especially Meeko and Havoc!
Closest to full room photo possible
The homemade giant frame picture holder thing that needs updated pictures as our wedding was over a year ago at this point!
The original hardwood floors under all that carpeting ended up being BEAUTIFUL!
Great find at TJ Maxx (I practically live there!) and flame less candle from Target
Such a great find that I had to go back the next day and buy the other one they had!
Who doesn't love them some symmetry?
Another TJ Maxx find! Obsessed with that store! With some help from my sister Elise we turned this cabinet into the perfect tv stand. Some power tools and girl power we cut through the back to allow the cables and power cords to go out the back.
Now my matryoshka dolls (nesting dolls) have a little home! Fun fact - I LOVE matryoshka dolls, but few people are privy to that little info therefore my collection has not expanded beyond human control......let's just say I may or may have not kinda like frogs at some point of my life which seemed to then make a go-to gift for me be anything frog therefore I had anything and everything you can imagine (yes anything you can imagine!) in frog themed form! I still love frogs but I was a bit frogged out at one point in my life.
The built in half wall that leads from the family room into the front entrance and to the main hallway.
Our tree frog Jaxon definitely approved of our color choice!
Love this quote!
The bearer of all things breakable
Even my boys got a color appropriate toy box....now to teach them to put their toys away! Another TJ Maxx find
Loved the two lamps the moment I saw them. I chanced it and didn't commit to them until the next day when I saw them there still waiting for me, they were just too perfect. Of course they came from TJ Maxx! Yes, please get me intervention, my eyes light up in that place! (Little does my husband Brian know I purchased a new piece of furniture from there yesterday....you will just have to wait until he comes home this weekend before my secret of what it is can be released!)
Dressed up those windows with some snazzy drapes!
Some fun accent pillows that went perfectly in the room....from no other than TJ Maxx....I was serious about that intervention!
Moving onto the front main entrance
A view from the door into entrance way that leads to the family room
New colorful light fixture. No longer does my dad hit his head on our old one!
Of course every house needs an entrance cross and this one is so very important to me. Not only did it come from Honduras from my first mission trip there in 2007, but it was a gift to my Uncle George when I had returned. It always sat on a corner bookcase at his home but then was hung above his bed a few days leading up to when he passed away. To know it hung above his bed when he crossed over to heaven brings a form of peace to me and makes it that more important to me. Every time I see it, it reminds me of both Honduras and him and brings a smile to my face!
Love this hanging over our front door....Brian has no excuse for not remembering our anniversary hehe!
Main hallway. Don't mind the missing frame on the wall of our wedding picture display. An unnamed whippet was running and jumped onto the couch on the other side of wall and the force hit the wall making the frame fall off the wall and shatter. Always something here :)
Our family tree is not complete as I have letters spelling out family still needing its last coat of black paint. Figured I would share what is done and when it is complete share the final look. Always a work in progress.
The family tree has pictures of our immediate family's (click to enlarge). Brian's parents and mine and then all the siblings I have (including GT who is 2nd generation) and Brian's brother. Even Levi and Meeko got their own branch seeing that they are part of the family!
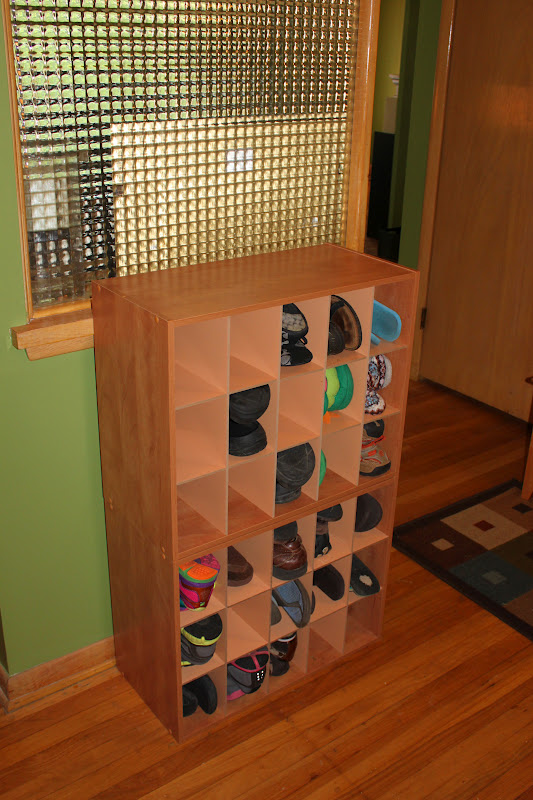
Love this new shoe organization. If you know me well you know my obsession with organization bins (yes I have several obsessions!) so this was one of my favorite finds! We bought two and stacked them and they work way better than our container of shoes we had to dig through.
I bought the coat stand bench after my mom and I went to see an item she wanted to buy that she found on craigslist. While there they were also looking to sell this and I snatched it right up. It has been living in our garage for a year prior but is now happy in its new location and makes the perfect place for holding covers and a great seat for putting shoes on!
I have one more room remodeled that Brian actually helped with and that's our guest room. I will share that transformation once I take some after pictures. With all these rooms behind us we now can start planning out remodeling our two bathrooms, kitchen, small bedroom, and finishing our already finished basement but making it more warm and homey feeling.....the work is never done!